might as well kick it off with some cake pops
So my sisters may be upset with this post, but only because this whole blog was their idea and they do not know I have since created it and am now blogging.... however I think they will get over it :)
Ok ok ok I know this post will not be relevant again until Halloween rolls around next year, but hey - deepfriedunicorn didn't exist until today and I wanted to share my cake pop success anyway. Plus you can make cake pops for any occasion, so in reality it is still relevant.
Around the office I have somewhat of a reputation of being a baker. I had not brought anything in as of late so I thought Halloween would be the perfect excuse. Thanks to my froworker (friend-coworker) Linsey, I was turned on to the idea of cake pops. I did a little research online and pulled the needed essentials/instructions from Bakerella <---- AMAZING (www.bakerella.com)
Here are the details of what's needed:
1 crumbled up cake (I just bought a normal boxed cake mix and baked it as directed, then destroyed with a fork)
1 can of frosting
A couple of bags of candy melts (can be found at Michaels or Walmart)
Anything you would like to decorate your cake pops with - I used some "candy corn" sprinkles and edible markers
Lollipop sticks
Goody bags
See below for an arrangement of everything I used:
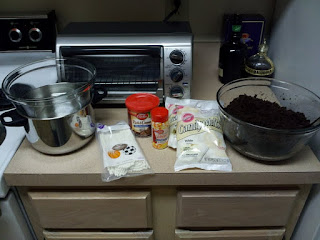
Note - the glass bowl and pan on the left are what I used as a double broiler. It worked perfectly but it's important to note that the glass needs to be heavy duty and needs to be big enough so that it does not sit too low and touch the water in the pan (I don't know why ... science)
So after you crumble up the cake, mix in the can of frosting. From here you will want to create 50 - 60 small balls (less than an inch in diameter?), but of course this is just preference - I'm sure it would work just fine with slightly larger and fewer balls. Pop those suckers onto a cookie sheet (I lined mine with wax paper) and put in the freezer to harden up. Now, to start melting those candy melts....
I used 2 bags of "candy melts" (honestly I don't really know what they were but I'm presuming white chocolate?) and put them all in the bowl at once. Keep the burner on low to med low because you don't want the "candy" to get too hot (again... science?), it gets too thick and is then hard to dip your cake balls in. Sidebar - if your melted deliciousness does get too thick just add a tid bit of shortening and it will do wonders. Mix up the melts as they begin to melt and continue on and off until they are all melted.
To cover the cake balls - take them out of the freezer (at first, I took them all out at once but I started to just take them out one by one as I was using them). After I wrote that, I realized it should be pretty obvious that you need to take them out of the freezer but I'll keep it in there anyways.

Dip your lollipop stick just barely into the melts and then stick into the cake ball about half way (note - consider where the flat side of the ball is when doing this so when you put it back down it can be on the flat side again). If your melted mixture is deep enough, you can just dip and then pull out. Mine was not quite deep enough, so I used a spoon to kind of push the mixture up on the balls. I would not recommend swirling as this runs the risk of the cake ball falling off. Similarly, you will probably need to get excess meltedness off but be careful with tapping as again, the cake ball could fall off.
From here, if you are adding sprinkles or other decoration that needs to stick to the wet 'icing', do that now and then place onto wax paper to cool and harden. Once all cake pops have been covered, most likely your first ones are ready to either be wrapped with a goody bag or decorated more. I added some jack-o-lantern faces to some of my orange cake pops with edible markers. Which reminds me, you can add food coloring to the melts (or buy colored melts). I would recommend using gel food coloring so it will not change the texture.
Here's my final product:

Needless to say, these were a huge hit at the office and oh my god are they delicious. If you are on a diet and are trying to cut back on sweets, do not be fooled into thinking these are a good idea because they are 'just a bite' because trust me, you will eat far more than one. I will definitely be making these again for the other upcoming holidays...
Jayla

andddddd I just realized I wrote "broiler" instead of "boiler"..... ugh I guess I need to proof my posts before posting....
ReplyDeleteyum yum!
ReplyDelete